The wall clock installation in your living space must be beneficial both functionally and aesthetically at the same time.
It helps you to keep the time and fill in the blank space on the wall prettily. And if you are a DIY enthusiast or planning to upgrade your skill, try the DIY wall clock. You can upcycle the old stuff in your shed and transform it.
Here we have screened through the internet and find wall clock ideas to make a statement in your space.
Contents
- Opt For The Black And White Tone
- Color Block DIY Wall Clock
- Giant Farmhouse Wall Clock
- Simple Asymmetrical DIY Wall Clock
- DIY Simple Fabric Wall Clock
- Oversized Vintage Wall Clock
- DIY Embroidered Basket Wall Clock
- Sliced Wood DIY Wall Clock
- DIY Moon Wall Clock
- DIY Vintage Bicycle Wall Clock
- Infuse The Chic Look
- DIY Holographic Wall Clock
- DIY Sleek Wall Clock
- The Exposed Concrete
- DIY Easy Photo Wall Clock
- DIY Modern Wooden Wall Clock
- DIY Minimalist Wall Clock
- DIY Wood Esque Starburst Wall clock
- DIY Simple Photo Wall Clock
- DIY Unique Wall Clock
- DIY Mid Century Wall Clock
- DIY Flower Wreath Wall Clock
- DIY Black Plain Wall Clock
- DIY Mid Century Modern Wall Clock
- DIY Wood Square Wall Clock
- DIY Rustic Wall Clock
- DIY Industrial Wall Clock
- DIY Straightforward Square Wall Clock
- DIY Chalkboard Wall Clock
- DIY Dominos Wall Clock
- DIY Driftwood Wall Clock
- DIY Simple And Elegant Wall Clock
- DIY Painted Wall Clock
- DIY Painted Cork Wall Clock
- DIY Music Sheet Wall Clock
- DIY Stacked Wood Wall Clock
- DIY Modern Industrial Wall Clock
- DIY Simple Numbered Wall Clock
- DIY Patterned Hexagonal Wall Clock
- DIY Plate Wall Clock
- DIY Scandinavian Wall Clock
- DIY Fabric Wall Clock
- DIY Hexagon Wall Clock
- Simple DIY Hand Painted Wall Clock
- DIY Dessert Pan Wall Clock
Opt For The Black And White Tone

The minimalist style of the house looks even greater if you accentuate it with the decorative piece. You can play with the color of the decorative piece. Consider the black and white color to make it works.
You will need the materials below:
- Clock mechanism
- Thick foam or polystyrene (thicker than the main body of the clock mechanism)
- Mountboard
- Plate
- Masking tape
- Retractable knife
- Paintbrush
- Craft knife
- Black paint
- Multipurpose glue
- Basket cane/reed
Place it on the desk against the wall. The neutral tone of the clock melts seamlessly with the vibe surrounding it.
For more natural look, try apply a wall baskets instead.
Color Block DIY Wall Clock

Create a wall clock to challenge your creativity. Choose the wood clock panel. Then, add the natural wood accent and the coral paint to infuse an artistic touch.
But before you paint it, ensure you sand down the wood panel, then strain it using a foam brush. Put the painter’s tape in the middle.
Paint one side with the coral paint then exposes the unpainted wood on the half side. Attach and glue the painted wood pieces around the clock, then install the clock mechanism.
If you’re looking for the shelves, take a look at DIY Shelves Ideas.
Giant Farmhouse Wall Clock

Upcycle the pallet spool and turn it into a farmhouse-style wall clock. It can upgrade your creativity skill that will infuse an attractive point at the same time.
Paint the pallet spool to infuse a rustic and antique look. Coat the wood with clear wax. Attach the address number to create a clock, which melts with the giant clock.
Put the clock on the desk against the wall. Beautify it with the white wire basket and the leaves or grass.
It looks weird, but you can fit this project into farmhouse bathroom decor.
Simple Asymmetrical DIY Wall Clock

Keep everything minimal, even when it comes to the decorative piece in your space. No worries, it won’t need any special skills to make it works. It is a super simple project, which is worth trying for the beginner.
Choose plywood material and let it unpainted to expose the natural color of the wood. Then, drill the wood to attach the clock mechanism. That’s all. You can add the number around the clock or keep it plain.
DIY Simple Fabric Wall Clock

Recreate your old clock and make it looks prettier. Try using the patterned fabric for an artistic look. The colorful fabric infuses a cheerful atmosphere, which is good for your plain wall.
Glue the fabric to the thick paper of the clock, and let it completely dries. Glue the buttons around the clock, and create a hole in the middle of the clock. It works to put the clock mechanism. After all, put the plastic plate.
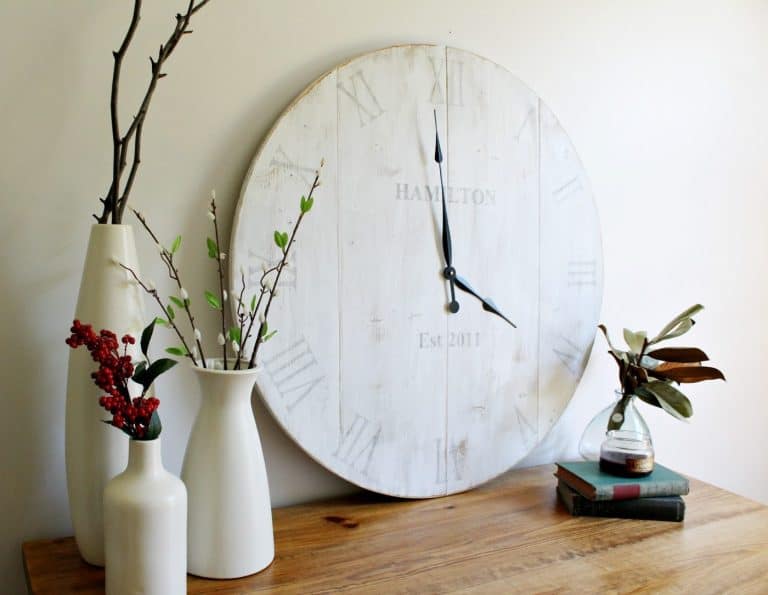
Oversized Vintage Wall Clock

You will need a decorative piece in your space to make a statement and accentuate the style. Upcycle the unused wood circle to make an oversized wall clock.
Sand down the wood to create a smooth surface, which is good to create an admirable look. Apply petroleum jelly to some random spots before you paint it. It creates a rough look to create a vintage style.
Draw the number on the wood, then paint them black. And if you want to create a distressed number, apply the petroleum to the numbers before you paint it.
Tip: this will perfectly matched to this industrial style bathroom.
DIY Embroidered Basket Wall Clock

Decorate your house with the bohemian style inexpensively. Transform the basket and elevate it into a sleek look within minutes. Create a hole in the middle of the basket, then attach the mechanism.
Then, represent each hour using the needle and thread sew dashes around the basket. You will need twelve hours, which are twelve sew dashes. Consider creating the bigger sew dashes on each quarter of hours. Then, the bohemian clock ready to attach and beautify your space as well.
Sliced Wood DIY Wall Clock

Try using the small wood disk and create it into an admirable wall clock.
The additional materials you will need are:
- Pencil
- Scissors
- Clock mechanism
- Larger sized clock hands
- Wood burning tool
- Red enamel paint
- Small foam brushes
- Polyurethane
- Power drill
- Paintbrush
- 22 grit sandpaper
Coat the wood with the enamel using a foam brush and let it dries. Burn the outline of the number onto the plaque using the wood-burning tool.
Create a hole in the middle of the wood to attach the mechanism.
DIY Moon Wall Clock

You won’t run out of ideas to create the decorative piece for your space. Sometimes it only needs a simple touch to create a pretty creation.
Create a moon wall clock to attach to your wall and infuse an artistic look in a simple way.
Supplies you will need:
- 7″ NASA moon printout
- Clock kit
- Cork trivet
- Scissors
- Cardboard paper
Measure and cut cardboard paper the same size as the moon and cork. Then, glue them. Create a hole in the center of the moon where you can attach the clock machinery.
DIY Vintage Bicycle Wall Clock

Declutter your old stuff in your shed and try to upcycle it into something functional. Try using the old bicycle wheel and make a vintage clock wall. You will also need the giant clock kit to complement the bicycle wheel.
It is a little bit tricky to make it works. But it doesn’t as complicated as it looks. Attach the clock kit and cover it with the lid of a paint can to hide the unwanted view.
After all, attach the giant clock to the wall. Attach the number on each quarter of the hour using the address number.
Infuse The Chic Look

Create the chic decoration in your house through the wall clock. Try creating it during your leisure time on the weekend.
Supplies you will need:
- Ruby Rock It- East Coast Collection
- Walnut Hollow Clock
- Americana Chalky Finish Paints
- Art Minds Clock Kit
- Pebbles Inc- Typewriter Thickers
Ensure the wood is well-sanded to create a smooth surface.
Paint the wood with the chalky finish paint and let it dries. Glue the papers and accentuate the chic style. Then, attach the clock and glue the pebbles around the wall clock.
DIY Holographic Wall Clock

Don’t let the pink wall of your study room looks too plain. Attach the wall clock that works to make it looks artsier. It is crafted from the woodblock base you can make even if you are a beginner in a DIY project.
Coat white the wood and let it perfectly dries. Apply the glue, then apply the vinyl to the wooden base. Use a ruler to smooth out the air bubbles. When it sets, attach the hands to the clock.
DIY Sleek Wall Clock

The sleek appearance in your living space must be on your consideration to elevating the beauty of your room. Try making it from the wood board or even cardboard as you wish.
Make a hole on the side of the clock to put the bird decoration. Then, paint the clock that similar to the wall tone. Attach the clock mechanism after you create the dots to represent the hour. After all, attach it to the wall and get ready for the stylish and simple wall clock.
The Exposed Concrete

Concrete material has such a magical power to make a statement even if there is nothing much to do. Mix up the concrete and create the light consistency for a smoother finish.
Spread the concrete to the wood and cover it well, then let it set perfectly. Create a hole in the center point of the clock to attach the clock mechanism. The concrete wall clock creates a modern decorative piece that will beautify your wall.
DIY Easy Photo Wall Clock

Transform your favorite figures into a functional decorative piece. The thing is, it doesn’t need any special skills to create it.
Besides, you can find the following materials easily:
- Photo paper
- Glue
- Clock kit
- Nail polish
- X-Acto knife
- Board
Print out your favorite figure of the photograph, then cut it and glue it to the board. Paint the clock arms with the nail polish, then attach it to the board. Use the nail polish to create the dots to represent the hours.
DIY Modern Wooden Wall Clock

Create a modern look by exposing the natural color and texture of the wood. It works way better if it is functional. Transform it into a wall clock. Here ate the supplies you will need:
- Live Edge Slab
- 14″ Macrame Rings
- Clock Movement
- Wipe-On Poly
- Picture Hanger
Sand down the wood for a smooth surface to perfect the finishing touch.
Polish the wood to accentuate the texture of the wood, let it dries.
Install the clock mechanism and ensure it is attached to the center point of the wood clock.
DIY Minimalist Wall Clock

Choose the minimalist style to upgrade the appearance of your space.
If you want to spend less money, create it using the materials below:
- Wooden plank
- Round wooden piece
- A drill
- Speckled pattern paint
- Painter’s tape
- Clock mechanism
- Strong glue
Create a hole in the center of the round wood before you apply the granite paint. Paint white the other part.
Attach the round wood to the clock mechanism on the wood plank. After all, install the clock’s hand and attach it to the wall.
DIY Wood Esque Starburst Wall clock

Infuse an elegant appearance that formed from the wooden wall clock you can create by yourself.
It will upgrade your woodworking skill. Besides, it is a budget-friendly project, which worth making. The sunburst details offer you an elegant look, which looks perfect on the polished wood.
It blends with the golden bamboo skewers and the clock ring frame. Attach it to the plain wall for a perfect look. It could be a focal point of your space.
DIY Simple Photo Wall Clock

Here is one of the smart ways to display your photographs. You can turn it into an oversized wall clock. You will need 12 favorite photographs and attach them to the wooden frame.
Attach the first 4 pictures on the wall and put them on the 12, 3, 6, and 9 o’clock. When they are attached perfectly, you can add the other ones.
Install the clock’s hand to the box. Consider painting the box using the same paint as the wall. Last, mount it at the center point of the wall clock.
DIY Unique Wall Clock

Create a pop-up accent to the wall in your space and ensure it is functional. The wall clock must be on your list to create a pretty touch to the wall and functional to track your time.
Measure the center point of the round wood, then create the wedge slice using a pencil. Cut the wedge slice before you paint it and put back the slice to the main wood.
Create the cake painting on the main wood and the slice one. The golden clock’s arm looks perfect, complementing the wall clock.
DIY Mid Century Wall Clock

Create the wall clock made out of polished wood. The natural texture and color of the wood offer you an elegant appearance. Combine it with the golden accent that will create a Mid Century style.
Drill the center point of the wood, then install the clock mechanism. After that, glue the dowel caps around the clock. The golden dowel caps blend seamlessly with the golden clock’s hand to accentuate an elegant look.
It could be a focal point of the space when you attach it to the white and plain wall.
DIY Flower Wreath Wall Clock

Infuse the cheerful atmosphere into your space through the flower wreath wall clock.
It also looks great to enliven the spring atmosphere.
Upgrade your creativity by creating by yourself.
Here ate the materials you will need:
- Wire wreath frame
- Floral tape
- Clock movement kit
- Cardstock
- Double stick tape
- Scissors
- Floral and greenery.
- Wall putty
- Nail or hook
Arrange the greenery on the wreath frame as well.
Then, put the flowers on the 12, 3, 6, and 9 O’clock. Attach the wreath to the wall. Then, create a hole in the center of the wreath on the wall to install the clock movement.
Need more projects to be done? You can make a wreath stand as well.
DIY Black Plain Wall Clock

The plain black wall clock looks great to add an attractive point to your wall. You can blend it easily on both blank walls or patterned ones.
Create your own wall clock using the round wooden base. Sand down the face of the clock for a smooth surface that will create a perfect finishing.
Then, attach the clock’s hand to the centerpiece of the wood. The white accent on the clock movement looks contrasts beautifully.
DIY Mid Century Modern Wall Clock

The Mid-century style could be one of the best ideas to lift up the design of your house. It offers you an elegant appearance that will elevate the value of your space and the entire house as well.
You can upcycle the old starburst clock with the other materials below to create a Mid Century Wall clock:
- Spray paint and craft paint
- Masking tape
- Twelve 1.5″ wooden balls
- Drill
- Grinder
The wooden balls and the arms of the clock look great together attached to the wall, which worth having.
DIY Wood Square Wall Clock

The creative decorative piece will make a statement to your house and also the homeowners. Hence, attaching this adorable wall clock is a great idea.
Supplies you will need:
- Wood panel 35 x 35 cm
- 18 pieces of plywood 0.7 x 4 cm
- Nails
- Clock mechanism
- Yellow spray paint
- Black marker
Sand the wood for a smoother surface and sleek finishing. Connect all the plywood to the main wood board, then paint it yellow.
Then, draw the numbers 3, 6, 9, and 12. Attach the hook and the clock movement.
DIY Rustic Wall Clock

Bring in the rustic style to your space that will elevate the appearance of the house. Try using the board to make a decorative piece that works to track your time as well.
Measure the rounded wood as you desire, then sand down and polish it for the basic coat. Paint white and infuse the distress some spots for a more aesthetic result.
Add the number after you mark them on the 30, 60, and 90 degrees from the center hole.
DIY Industrial Wall Clock

The industrial style is popular with rough material. It also infuses an elegant and cool atmosphere at the same time. Attach the industrial wall clock in your space that will help you to beautify your house with a simple step.
It is crafted from round wood with a little touch of dark tone.
Complement the beauty of the industrial style through the cut plat numbers.
The numbers represent the hours. The colorful numbers add different hints on the wood that accentuate the industrial style.
DIY Straightforward Square Wall Clock

Try maximizing your leisure time when the weekend comes by creating a wall clock made out of wood. Plywood material could be on your consideration since it has a beautiful texture.
You only need to polish it with a clear coating. Besides, the light tone of plywood can blend with any kind of design you apply.
Attach the mechanism to the center point of the wood. Then glue the plywood battens around the mechanism.
Install the black arms that contrast beautifully with the unpainted clock.
DIY Chalkboard Wall Clock

It would be great to create your own clock where you can write the notes on it. It is a simple project you can do within hours.
You will need plywood and cut them using the laser cutter. Glue the round base and the rings and clamp it as well. Sand it down for a smooth surface along the edge.
Paint it using black chalkboard paint and apply some coats to create a great finishing.
Once it dries perfectly, you can start assembling the clock mechanism and the clock arms. Write the hours with chalk, and it is ready to attach.
DIY Dominos Wall Clock

Bring back your old wooden game board and transform it into something extraordinary.
The thing is, it won’t cost you a lot. Yet, it gives you a different look, which could be an attractive point in your space.
Create a hole in the center of the wood. Then, arrange the dominos before you glue them to ensure they are set perfectly.
After all, install the clock mechanism and the arms. Last, put it on the wall or lay it on the desk against the wall.
DIY Driftwood Wall Clock

Infuse the summer vibe into your space inexpensively and straightforwardly. Choose the functional decorative piece that takes part to infuse the nautical atmosphere.
Find a good quality driftwood to make a wall clock. Mark the clock mechanism on the driftwood using a pencil.
Then remove the wood from inside the lines, and create a hole in the center point where you put the mechanism.
Install the mechanism and the arms. Voila! The nautical accent is ready to beautify your blank wall.
DIY Simple And Elegant Wall Clock

A simple touch on your woodworking could take a huge part to transform it into something admirable.
You can try upgrading the wood wall clock with a leather strap to create a different look.
What you will need:
- A round wooden chopping board (mine was 30cm in diameter)
- Black leather strap or an old belt
- Leather punch
- Clock mechanism
- 2 small shallow brass screws
- Power drill
- Drill
- Pencil & ruler
- Screwdriver
You only need to measure the center point of the wood, then drill it to attach the clock mechanism and the clock arms.
Then, place the leather and screw both sides using the brass screws.
DIY Painted Wall Clock

Infuse the other simple nautical decorative piece to your house using the blue painted wooden wall clock.
Consider creating it by yourself to save money. Materials you will need:
- A clock kit
- Wood clock base
- Acrylic paint of your choice
- Painters tape
Ensure you drill the center point of the wood clock base to attach the clock mechanism.
Apply the tape off the half wood using painter’s tape. Paint blue the half part of the wooden clock, let it perfectly dries. Once you finish installing the clock mechanism, you can attach it to the wall.
DIY Painted Cork Wall Clock

Paint the corks to create a decorative piece you can attach to your wall. Besides, the clock mechanism additional elevates the function of the corks. Opt for the bright color to paint the cork that will make it looks gorgeous.
Use the tape to create the shapes you desire to paint. It keeps the paint clean and creates a smooth painting. Other than that, consider painting the movement with black and white color. The geometric design of the wall corks could be an admirable point in the wall.
DIY Music Sheet Wall Clock

For those who love music, try utilizing the old and unused music sheet and turn it into a wall clock. It will infuse an admirable accent in your space that accentuating the artistic style.
Choose the wooden frame and let it exposing the natural color of the wood. Apply the music sheet on the frame, then attach the plexiglass crystal to protect the music sheets inside. Install the hook on the back part of the clock, where you can attach the clock to the wall.
DIY Stacked Wood Wall Clock

The DIY project will always be the best choice for the DIY enthusiast. The inexpensive project will be a great option if you upcycle the materials that available in your house. Choose the unused wooden planks, then let them expose their natural color.
Choose the different tones of the wood. Stack the wood from the darkest to the lightest tone, which creates a beautiful gradation of the natural wood. Then, complement it with the black movement.
DIY Modern Industrial Wall Clock

The combination of the metal ring with the wood material must be on your list to infuse the industrial style. It is a tricky project you can do even when you are a beginner on a woodworking project.
Measure the wooden board to ensure that it fits the ring perfectly. Attach the clock mechanism to the wood. Then create a hole in the center point of the wood to install the clock’s arms.
Lastly, polish the wood to accentuate the natural texture and color of the wood.
DIY Simple Numbered Wall Clock

If you love crafting, choose the DIY wall clock made out of simple material. It is your challenge you upgrade the simple material and make it looks fabulous.
You will need:
- A clockwork
- Templates of numbers
- Scissors
- Tack colored adhesive pads
Install the white clockwork on the wall. After that, put the numbers around the clockwork, then stick them with the colored adhesive pads.
Ensure you choose the unique font to create a great appearance. The colorful adhesive pads create a colorful accent.
DIY Patterned Hexagonal Wall Clock

The hexagon shape is one of the most favorite shapes, which are popular to decorate your space.
Consider combining some hexagons and create a DIY wall clock.
Supplies you will need:
- A sheet of heavy paper
- Hexagon template
- Pencil
- Fabric pen
- Scissors
- X-Acto knife
- Glue
Create the hexagon shape on the heavy paper and the fabric.
Glue the fabric to the paper and let it dries. Glue the edge of the hexagon, then connect the other one and let them dry.
Attach the clock mechanism along with the clock’s arms, then attach it to the wall.
DIY Plate Wall Clock

You can even transform your beautiful plate and change it into a wall clock. It is a super simple project, yet you have to be very careful while doing it.
Drill the center part of the plate where you can attach the movement and the clock mechanism.
Choose the navy movement. It would create a perfect combination between the soft minty plate and the navy movement. Besides, the golden edge offers you an elegant appearance.

Since the Scandinavian style is one of the timeless styles, applying the Scandi style is the best choice.
You can start with the simplest project with the supplies below:
- Birch plywood
- Clock movement
- Pencil and ruler
- Scroll saw
- Belt sander
- Paint and paintbrush
- Wood glue
- Drill
Draw the shapes of the mountains on the plywood. Create the smaller mountains, then paint them white. Glue the small mountain and press in place on top of the bigger mountains.
Once it dries, you can start drilling the center point of the mountain to install the clock. After all, install the hook and attach it to the wall.
DIY Fabric Wall Clock

Track your time stylishly through the upholstered wall clock. Choose the colorful accent to your white and blank wall to enliven the vibe in your space.
Get the supplies below to make the DIY wall clock:
- Round clock base
- Patterned fabric
- Mod Podge
- Foam brush
- Scissors
Cut the fabric that fits the wooden clock base. Brush mod podge onto the top of the wood. Then put the fabric and let it dries perfectly.
Cut the fabric in the center point of the clock to install the clock movement. Voila! The clock is ready to beautify your space.
DIY Hexagon Wall Clock

Here is the other DIY hexagon wall clock idea you can try to make during the leisure time. The combination of the hexagon shape and the white marble gives you an elegant appearance.
It looks perfect if you attach it to the darker wall paint to make it looks contrasts beautifully.
The materials you will need are:
- Clock movement kit
- Gold foil paper
- Marble shelf liner
- Foamcore board
Install the clock movement kit once you drill the center point of the clock. Then, assemble the clock hands.
Simple DIY Hand Painted Wall Clock

Add a simple touch to the wooden wall clock to create an artistic accent. No worries, you don’t have to be an expert on painting to make it works.
Create the 12 equal segments to the wooden clock. Use the tape to separate the solid painting and the patterned ones. The tape helps you to prevent the paint from bleeding over.
When it dries, you can start assembling the clock mechanism and the clock hands. The golden clock hands look great if you are planning to infuse an elegant touch.
DIY Dessert Pan Wall Clock

If you are wondering how to create an extraordinary wall clock, consider using the dessert pan.
There is nothing much you need to do to make it works.
Paint it with your favorite color, then let it dry. The yellow paint offers you a cheerful vibe, which could be a focal point in your space.
Other than that, choose the antique hands. The curvy hands blend with the wavy edge of the clock. Plus, the black hands look contrast admirably with the yellow clock, which is perfect.
These are the wall clock ideas we have compiled to inspire you. Choose the design carefully to create a perfect look. It works the same way when you choose the tone of the clock.
Happy crafting!