A workbench is such an essential thing you should have. It can be a good option to make your woodworking works better.
Unfortunately, you have to make sure that the size is to fit your workshop. Other than that, you have to make sure that it also fits your budget as well.
We have compiled some workbench plans that will brighten up your inspiration. You can choose from the easiest to the hardest one below:
Contents
- Space-Saving Workbench Plans
- DIY Garage Workbench
- DIY Simple Workbench Plans
- DIY Movable Workbench
- Easy Workbench Plans
- DIY Workbench with Storage
- DIY T-Track Assembly Workbench Plans
- Simple Plywood Workbench
- Rustic Workbench Idea
- DIY Mobile Workbench
- DIY Fold-Down Workbench
- DIY Workbench with Miter Saw Stand
- Back To The Basic
- Simple Sturdy Workbench Plans
- Straightforward Workbench Plans
- Small Workbench Plans
- Folding Mobile Workbench Plans
- DIY Cheap Workbench
- Trunk Foldout Workbench
- Minimalist Workbench Plans
- Multipurpose Workbench Plans
- Simple Assembly Workbench Plans
- Heavy Duty Workbench
- DIY Mobile Workbench Plans
- Portable Workbench Plans
- Workbench Plans With Wheels
- DIY Workbench Plans For Kid
- 4 x 8 Workbench Plans
- Drop Down Workbench Plans
- Workbench Plans With Drawers
- DIY Painted Workbench Plans
- Compact Workbench Plans
Space-Saving Workbench Plans

Living in a limited space sometimes forces you to be more creative. That is why it should be your opportunity to challenge your skills and creativity.
You can start with the workbench in your garage. Keep your tools and equipment well organized and make sure that your woodworking works well with this workbench.
DIY Garage Workbench

One of the perks of having a workbench in the garage is that you can store the tools and equipment in one place. Other than that, a workbench in a garage can work as the home repair hub.
Install a pegboard to place the tools so that you can find them easily and keep them tidy. After that, place the workbench under the pegboard to convenient your working time.
Utilize the space under the workbench to store the other tools or equipment.
DIY Simple Workbench Plans

A workbench is such an essential thing that supports your work. This DIY simple workbench tutorial will lead you to build your own.
Choose the Douglass fir that has an exotic texture the wood. That is why you only need to polish it to expose the natural beauty of the wood itself.
Bore the holes on the benchtop, then install the Yost woodworking vise that will hold the workpiece. You also need to install the bench dogs that fit into the holes.
DIY Movable Workbench

You will need a comfortable workbench, indeed. Other than that, you will also need a convenient one. And the comfortable and convenient workbench comes from the movable workbench. That is why it is worth making.
Create a bench with a holder underneath to store your stuff. After that, install the casters. Place this workbench under the shelves where the other stuff is stored tidily.
More idea you might love DIY Shelves
Easy Workbench Plans

If you want to build a workbench, but you don’t have enough time then, this simple DIY workbench is the best option. And if you don’t have any spacious area, this workbench is all that you need.
It doesn’t only fit the limited space in your house. Other than that, it is easy to build so that you don’t need to spend much time building it.
Tips: Opt to use the construction lumber that is sturdy and durable enough for years.
DIY Workbench with Storage

Build a workbench along with the storage that helps you to keep the tools and other stuff well-organized.
First, cut cabinet sides and attach stretchers. Install drawer slides, build the drawers, and install them. After that, you can work with the benchtop. Install the pegboard to hold some tools, then install the LED light.
DIY T-Track Assembly Workbench Plans

Building a T-Track Assembly workbench is one of the best options for you who love wood-working or repairing.
It can support your work and convenient your working time. And if you want to build the workbench, you will need plywood because it is cheaper and not too weight. Install the casters before the workbench is getting heavier.
After that, install the drawer where you can keep your stuff well-collected. You will also need the Rockler clamp racks for the F-Style and Quick Clamps.
Simple Plywood Workbench

If you are on a budget and need a workbench, opt to use the plywood material because it is both cheap and easy to make.
Build the frame, then the storage under the top bench. Install the casters to simplify your work, where you can move it easily. After that, paint the legs and let the natural color of the benchtop to make it looks prettier.
You can also install other storage to store the stuff you will need so that you can find them easily.
Rustic Workbench Idea

It is always a good idea to bring in the rustic style to your house. Even you can create the rustic style in your garage, by creating the rustic workbench. Combine the wooden plank with the galvanized pipes that work to shore the plank.
You don’t have to modify the wooden plank too much to keep it natural. You only need to sand down the plank, then set up the water pipe.
After all, the rustic workbench is ready to beautify your garage.
DIY Mobile Workbench

What is more delightful than having a workbench that convenient your working time?
Having a DIY workbench that can move around wherever you need is all that you need. It helps you to minimize your move so that you can work well.
Choose the caster wheels that can handle 25kg. On another side, you need to install a drawer that can handle a 30kg load so that you can collect your tools in one place.
DIY Fold-Down Workbench

If you want to deal with the limited area of your workspace, you will need this fold-down workbench.
You will need the following supplied to build the fold-down workbench:
- Piano hinge
- Plywood
- 2×4 board
- Wood cleats
- 1×4 boards
First, you have to make the frame that followed by attaching the wood cleats on the ledger board, then attach the hinges.
DIY Workbench with Miter Saw Stand

If you are a wood-working enthusiast or love repairing the stuff, a DIY workbench with a miter saw stand should be in your workshop.
You can customize your own workbench as well when you build it by yourself. This workbench can be the best storage to keep your tools well-organized.
Add the casters wheel so that you can move it easily. Other than that, this kind of workbench can turn your workshop into the professional one.
Back To The Basic

If you want to build a workbench effortlessly, the basic workbench is all that you need. You don’t need to modify the workbench much to make it works properly.
You only need to make sure that you choose the right material. The supplies you will need are 2x4s and a single sheet of MDF. The tools you will need are a drill and a circular saw.
Fortunately, this DIY project doesn’t require any skills. So if you are a beginner, this project is worth trying. Find your tools and supplies, and get ready to make it!
Simple Sturdy Workbench Plans

The perks of making your own workbench are that you can improve your skills and customize it as you wish. The critical thing about a workbench is that it must be sturdy to hold the workpieces.
The materials that you will need are:
- 2 1/2 inch screws
- Elmer’s Wood Filler
- 120 grit sandpaper
- Wood conditioner
- Paintbrush
You can start with the frame of the workbench (see how to make it here). Once you are finished making it, you can attach the benchtop.
Straightforward Workbench Plans

The best answer for those who don’t have enough time for wood-working is the straightforward workbench. It is easy to make, yet work the same way to hold your workpieces.
Since it works to hold some workpieces, you have to ensure that it is sturdy.
You can join the frames with some 3/4″ dowels that make the workbench steady so that you can put any tools or equipment that heavy enough to the workbench.
Small Workbench Plans

If your workshop is not spacious enough to store some big tools and equipment, you need a small workbench.
It is the best alternative if you are on a budget because you don’t need to purchase any equipment.
The materials you will need:
- 7/16″ OSB (4’x8′)
- 8′ 2×4
- 2 1/2″ Coarse Thread Drywall Screws
- Wood Glue (Optional)
First, you have to measure the size that fits your workshop. After that, you can start cutting the materials then assemble the frame as well and followed by secure OSB.
Folding Mobile Workbench Plans

If you are wondering how to deal with the limited area or you are the type of person who loves moving, here is the best answer.
You can make a folding mobile workbench that will convenient for you. You can even fold the workbench into 7inch thick with the materials below:
- 1-3/4″ Construction screws
- 1×3 Pine
- 2×4 Pine (30′)
- 3″ Construction screws
- 3″ locking swivel casters (4)
- 3” Butt hinges (8)
- 4′ x 8′ sheet of 3/4″ plywood
- 5″ strap hinges (4)
- Hook-and-eye latches (2)
- Wood glue
This kind of workbench is the best option so that you can carry it easily.
DIY Cheap Workbench

There is nothing to worry about when you need a workbench, but you are on a budget. This kind of workbench is affordable, yet it works the same way.
Use plywood instead of hardwood. Assemble the frames and fastened them with screws. You can add storage under the benchtop where you can keep your stuff well-organized.
Attach the caster wheels on each corner of the workbench so that you can move it easily.
Trunk Foldout Workbench

Bringing your workbench wherever you want is a sophisticated idea. You don’t need to worry about leaving tools at home anymore since you can bring them wherever you go.
This project requires more effort, indeed, but it worth making. You have to measure the size of the workbench you are going to make and make sure it fits in your trunk.
Minimalist Workbench Plans

Bring in the minimalist design in your workshop by adding the minimalist workbench. It can work to hold your workpiece and be the focal point in your workshop at the same time.
Choose the plywood material that is cheaper than the hardwood, and the thinner cuts are easy to work with.
Prepare the materials as well, then cut the plywood according to the size you want. After assembling all the pieces, you can start finishing.
Sand down the plywood, then polish it. It will create an adorable finish.
Multipurpose Workbench Plans

This workbench can be the focal point of your workshop since it is appealing to the eye. Functionally, it can hold your workpieces, and the multiple drawers can keep your tools well-storage.
You will play with the 3/4″ plywood for the front, back, and sides. The drawer bottoms will use the 1/2″ plywood.
You can improve the finishing by painting the drawer, then let the other part expose the natural color of the wood.
Simple Assembly Workbench Plans

If you want to make a professional workbench at your workshop, this idea is all that you need.
You can use the materials from the previous workbench and planning to modify it, you can use the good quality of the materials like the lumber, castors, and any other materials. After that, you can start assembling the frame.
Create the shelf along with the divider to keep your tools tidy and paint it. Insert the shelf into the frame of the workbench. Trimm out all the edges and the tabletop to create a good finished look.
Don’t forget to install the charging station to convenient you and avoid the annoying cords.
Heavy Duty Workbench

Build your own heavy-duty workbench to keep you working ergonomically, strong enough to support a bunch of weight, and also will last for decades. Construct the legs made out of water pipe, which strong enough to hold the wooden top.
Then, install a shelf on the bottom of the workbench so that you can store your stuff in place and make everything handier. For a better look, consider coating the frame with high gloss white paint.
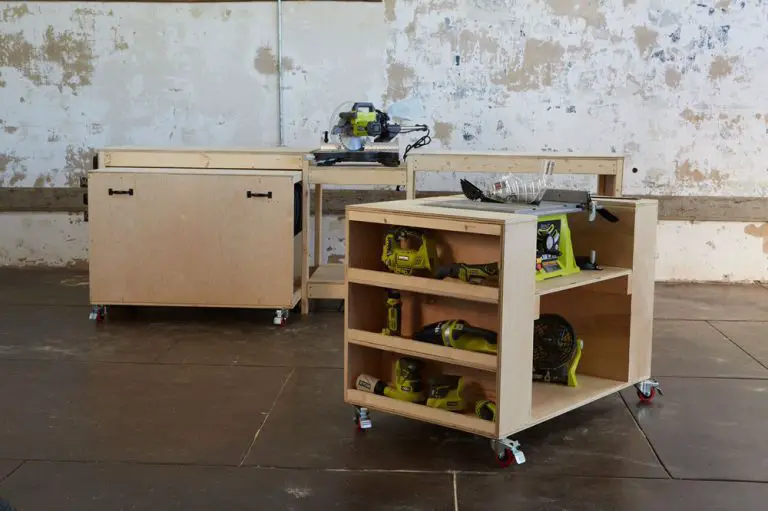
DIY Mobile Workbench Plans

Support your woodworking time by creating a mobile workbench. You will need some extra space to keep the stuff along with the tools to stay in place.
Extend the storage on the side part of the workbench with some separation on the upper part, and create a bigger one on the lower part.
You can use any kind of wood as you wish. The thing is that it is sturdy enough to hold the stuff. The key element of this mobile workbench is the caster wheels.
Portable Workbench Plans

If you only have a short of time and money to create a workbench when you need it, this portable workbench is worth making. It is constructed by the premium studs and the MDF sheet.
And if you are planning to make it portable, adding the casters where you can move it easily.
This straightforward project must be the best option to do during your leisure time. Here are some tools that will help you:
- Drill
- Miter Saw
- Brad Nailer
- Tape Measure
- Pencil
- Safety Glasses
- Hearing Protection
Workbench Plans With Wheels

Ensure you work on a proper workbench to construct and assemble your work as well. Other than that, it offers you a safer working environment.
Measure the size of the workbench that adjust your space. The additional storage under the top helps you to carry your stuff and the equipments.
On the other side, adding the locking casters will make your working time way greater. You will also get some assistance or pull the workbench as well.
DIY Workbench Plans For Kid

If your kids love woodworking, support them by giving them a workbench, so they know how to work such a pro. Attach the pegboard on the back part of the workbench where you can hang the tools and pieces of equipment and make it handy.
On the other side, attach additional storage underneath to keep the bigger stuff. Choosing the pinewood to create a workbench is such a great decision. Besides, it is also an affordable material that offers a beautiful look.
4 x 8 Workbench Plans

The big workbench offers you convenient woodworking so that you can move and work easily.
This extra size workbench is constructed by the plywood and the studs.
You don’t need any certain skill to create the workbench. Hence it could be a perfect project for a beginner.
The workbench has extra shelves under the surface where you can store your tools properly. Also, attach a magnetic strip to hold screws, drill bits, tools, and other miscellaneous things. The magnetic strips would be a handy feature to your big workbench.
Drop Down Workbench Plans

Don’t underestimate the strength of this slender workbench, which must be in your garage. It is the space-friendly workbench you can build against the wall, it is complemented by the pegboard to hold your tools.
Mount the bench to the wall, then install the two legs on the front part to hold the surface sturdily. The hinges installations allow you to drop it down when it is unused so that you can use the space conveniently.
Workbench Plans With Drawers

When it comes to the workbench, you will think that it needs extra storage to keep the tools and equipment in one.
And when you have to deal with the small area. Then adding the drawers would be a great option to store them properly.
Consider creating the various size of drawers, which fits from the small to the big tools. The drawer will make the workbench way heavier. Hence, the caster installation assists you while moving it.
DIY Painted Workbench Plans

Add a little colorful hint to your woodworking area to prevent the boring look of your garage. Consider using plywood to create the shelf and the top. Before you start assembling, you have to paint all of the components of the workbench.
When it dries completely, you can start assembling it. Add a shelf under the top where you can put the stuff and make it handier. Other than that, create a big gap between the ground and the shelf. It allows you to put the other stuff on the ground.
Compact Workbench Plans

Here is the other workbench idea you need to consider that will help you work like a pro. The bench must contain extra storage like drawers and an open shelf. The open shelf works to keep bigger and heavier stuff. Then you can put the smaller stuff in the drawer.
Hang the most-used tools on the pegboard so that you can reach them easily. Make sure you create a beautiful workbench by painting it and also polish it. It works to expose the natural color and the natural texture of the wood.
Happy building!